> ## Documentation Index
> Fetch the complete documentation index at: https://docs.stagewise.io/llms.txt
> Use this file to discover all available pages before exploring further.
# Quickstart — Your first prompt with stagewise
> Connect a workspace to the stagewise agentic IDE and send your first AI coding agent prompt. Workspaces, @mentions, slash commands, and diff review in under 5 minutes.
Connect a workspace and send your first prompt in under 5 minutes.
## Before you begin
* [stagewise installed](/getting-started/installation) and launched
* A project folder on your machine (any language, any framework)
* Optional: signed in to your stagewise Account for instant model access. If you skipped authentication, make sure you've [imported your API keys](/reference/byok-setup) or [connected a local model](/reference/custom-providers)
## Step 1: Connect a workspace
A workspace is any folder you want your AI coding agent to access.
1. Click the workspace panel in the sidebar
2. Click **Add workspace** and select a folder
3. The agent can now read, write, and modify files in that folder
Connect multiple workspaces to let agents work across your full stack. [Learn more about workspaces →](/core-concepts/workspaces)
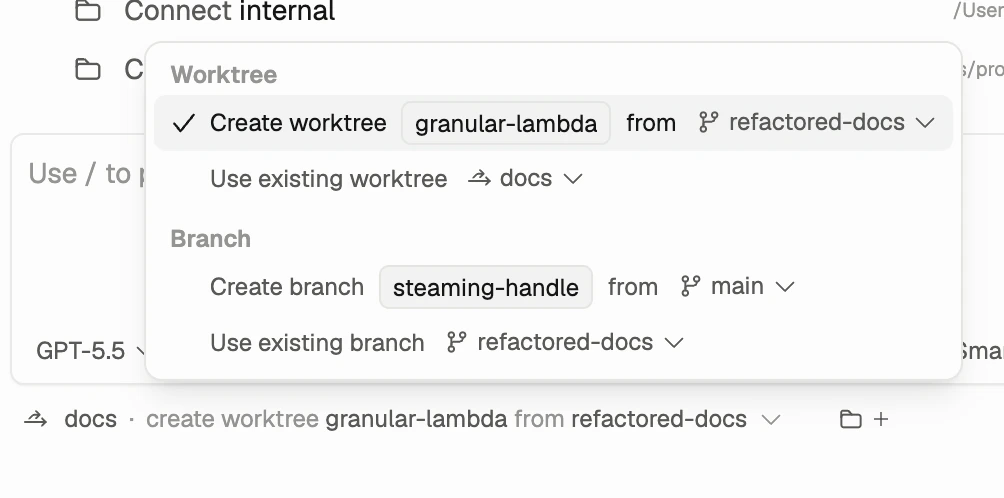 *Choose an existing workspace or create a worktree/branch-backed workspace before prompting the agent.*
Workspaces are not sandboxed. The agent operates directly on your filesystem. Every change is tracked so you can review or undo anything.
## Step 2: Open the chat
The chat panel is where you talk to your agent. You can:
* **Type instructions** — Describe what you want in natural language
* **@mention files** — Reference specific files for the agent to work on
* **@mention tabs** — Attach browser tabs so the agent sees what you see
* **Select DOM elements** — Click elements in the browser to attach them as visual context
* **Use slash commands** — Type `/` to access skills, plugins, and agent features
*Choose an existing workspace or create a worktree/branch-backed workspace before prompting the agent.*
Workspaces are not sandboxed. The agent operates directly on your filesystem. Every change is tracked so you can review or undo anything.
## Step 2: Open the chat
The chat panel is where you talk to your agent. You can:
* **Type instructions** — Describe what you want in natural language
* **@mention files** — Reference specific files for the agent to work on
* **@mention tabs** — Attach browser tabs so the agent sees what you see
* **Select DOM elements** — Click elements in the browser to attach them as visual context
* **Use slash commands** — Type `/` to access skills, plugins, and agent features
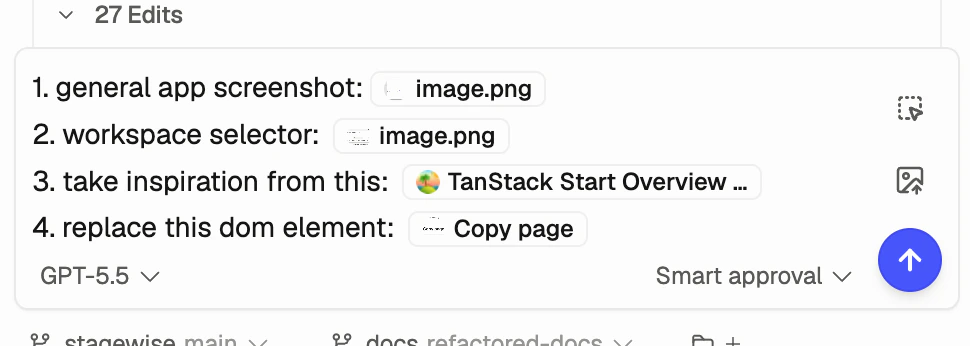 *Attach context directly in the chat input so the agent knows which files, tabs, screenshots, or elements matter.*
## Step 3: Send your first prompt
Type a prompt and press Enter. Start with something exploratory:
> *"Summarize the structure of this project and suggest three improvements."*
The agent reads your files, analyzes the project, and responds with a plan. You can then ask it to implement the suggestions.
## Step 4: Review changes
Every file edit the agent makes is tracked. After the agent modifies code, you'll see an inline diff summary in the chat:
* **Accept** changes you want to keep
* **Reject** changes to revert them
* **Undo** or **redo** entire tool calls
Open the **Diff Review** page to see all pending changes across files. [Learn more about diff review →](/core-concepts/diff-review)
## Add context and commands
Use the chat input for mentions and slash commands. Use the browser toolbar or hotkey for DOM selection.
| Action | How to do it | What happens |
| --------------------- | ------------------------------------------------------- | ---------------------------------------------- |
| Mention a file | Type `@` in the chat input, then choose a file | Attaches the file as context |
| Mention a browser tab | Type `@` in the chat input, then choose a tab | Attaches the page as context |
| Run a slash command | Type `/` in the chat input, then choose a command | Opens skills, plugins, and agent actions |
| Select a DOM element | Click the DOM selector button or press `⌘ I` / `Ctrl+I` | Attaches a debug file for the selected element |
## Write useful prompts
Give the agent a specific target, expected behavior, and any constraints.
Good prompts include:
* The file, component, or page you want changed
* The exact behavior you expect
* Screenshots, browser tabs, files, or DOM selections when visual context matters
Example:
> *"Add input validation to the login form and show error messages below each field."*
Start a new chat for each distinct task. Use the DOM context selector when a visual change is easier to point at than describe.
## What's next
Understand the agent loop and how AI coding agents process your requests.
Connect multiple workspaces for full-stack agent workflows.
Teach agents project-specific patterns and integrate your stack.
Use existing provider API keys.
*Attach context directly in the chat input so the agent knows which files, tabs, screenshots, or elements matter.*
## Step 3: Send your first prompt
Type a prompt and press Enter. Start with something exploratory:
> *"Summarize the structure of this project and suggest three improvements."*
The agent reads your files, analyzes the project, and responds with a plan. You can then ask it to implement the suggestions.
## Step 4: Review changes
Every file edit the agent makes is tracked. After the agent modifies code, you'll see an inline diff summary in the chat:
* **Accept** changes you want to keep
* **Reject** changes to revert them
* **Undo** or **redo** entire tool calls
Open the **Diff Review** page to see all pending changes across files. [Learn more about diff review →](/core-concepts/diff-review)
## Add context and commands
Use the chat input for mentions and slash commands. Use the browser toolbar or hotkey for DOM selection.
| Action | How to do it | What happens |
| --------------------- | ------------------------------------------------------- | ---------------------------------------------- |
| Mention a file | Type `@` in the chat input, then choose a file | Attaches the file as context |
| Mention a browser tab | Type `@` in the chat input, then choose a tab | Attaches the page as context |
| Run a slash command | Type `/` in the chat input, then choose a command | Opens skills, plugins, and agent actions |
| Select a DOM element | Click the DOM selector button or press `⌘ I` / `Ctrl+I` | Attaches a debug file for the selected element |
## Write useful prompts
Give the agent a specific target, expected behavior, and any constraints.
Good prompts include:
* The file, component, or page you want changed
* The exact behavior you expect
* Screenshots, browser tabs, files, or DOM selections when visual context matters
Example:
> *"Add input validation to the login form and show error messages below each field."*
Start a new chat for each distinct task. Use the DOM context selector when a visual change is easier to point at than describe.
## What's next
Understand the agent loop and how AI coding agents process your requests.
Connect multiple workspaces for full-stack agent workflows.
Teach agents project-specific patterns and integrate your stack.
Use existing provider API keys.